How To Enable And Use Self-Withdraw
Last updated: July 23, 2026
Over the course of a study, a participant may decide they want to leave. Chloe lets you control whether participants can withdraw themselves directly from the mobile app, or whether your team must withdraw them for them. When self-withdraw is turned on, a participant can remove themselves from a study in just a few taps — no action is needed from your team.
This article covers:
How to enable self-withdraw for your study in the Admin Portal
How a participant self-withdraws from within the Chloe mobile app
Good To Know: When a participant withdraws themselves, they are marked as Withdrawn and their study events are no longer accessible — the same outcome as a manual withdrawal. Their chat thread will also be archived, so make sure any final instructions (such as what to do with unused product) are shared before this point.
How To Enable Self-Withdraw
Self-withdraw is controlled per study from the Study Info tab of your study in the Admin Portal.
Turn it on. Open your study, go to the Study Info tab, and find the question “Allow participants to self withdraw?” Select Yes to allow participants to withdraw themselves.
Yes — Participants can withdraw themselves from the study directly inside the Chloe mobile app.
No — Participants cannot withdraw themselves. If they want to leave, your team must withdraw them manually from the Admin Portal.
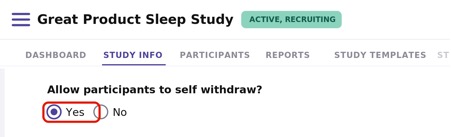
Study Info — set “Allow participants to self withdraw?” to Yes.
Pro-Tip: If this setting is left on No, participants will not see a withdraw option in the app, and you will need to withdraw them yourself from the Participants tab.
How Participants Self-Withdraw
Once self-withdraw is enabled, participants can leave the study on their own from the Chloe mobile app. The steps below are written in plain language — you can copy them into a chat message or email and share them directly with a participant.
Step 1 — Open your study. From the Chloe app, tap My Studies in the bottom navigation bar, then tap your active study card to open it.
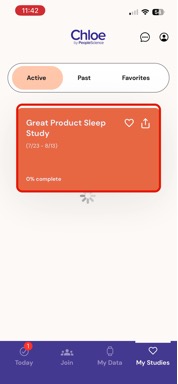
My Studies — tap your active study card.
Step 2 — Open the study settings. Tap the cog (gear) icon in the top-right corner of your study card. This opens the Study Information page.

Tap the gear icon in the top-right corner.
Step 3 — Tap Withdraw. Scroll to the bottom of the Study Information page and tap the Withdraw button.

Study Information — tap Withdraw.
Step 4 — Confirm. A confirmation message appears: “Are you sure you want to withdraw from the study?” Tap Yes to confirm. You are then withdrawn from the study automatically.

Tap Yes to confirm the withdrawal.
Questions Participants May Ask
“What happens after I withdraw?”
You are immediately marked as withdrawn. Your study events will no longer be accessible to you.
“I don’t see a way to withdraw — where is it?”
If there is no Withdraw button on your Study Information page, self-withdraw has not been enabled for that study. Reach out to the study team through the in-app chat and they can withdraw you.
“Can I rejoin after I withdraw?”
Withdrawing removes you from the study. If you withdrew by mistake or want to return, contact the study team through the in-app chat.
Questions Participants May Ask
What happens after I withdraw?
You are immediately marked as withdrawn. Your study events will no longer be accessible to you.
I don’t see a way to withdraw — where is it?
If there is no Withdraw button on your Study Information page, self-withdraw has not been enabled for that study. Reach out to the study team through the in-app chat and they can withdraw you.
Can I rejoin after I withdraw?
Withdrawing removes you from the study. If you withdrew by mistake or want to return, contact the study team through the in-app chat.